Thursday, April 2, 2009

Weathered In

Strange to say, but even in Hawaii, it's possible to get weathered in. At least if your definition of "weathered in" means "can't fly kites." A series of weather systems have moved across the Pacific recently, bringing with them rain and torrential tradewinds. During the few sorties I've taken out of the house, I brought along my handy anemometer, a Kestrel 2000, and measured the wind wherever I was. Typical readings over the past week and a half have been 18 knots gusting to 23+, and turbulent as can be. Not ideal kite flying weather.

So I was busy at home.

It would've been great to get out in the shop, but since the kids were on spring break, most of my time was spent inside the house. When you can't get to the shop, you bring the shop to where you are. Within limits, of course. It meant no lathe work, no mill work, and even my scroll saw was too far from the action to be used. But soldering equipment and software development were fair game.

Two projects got the most time. One was to build a new AutoKAP controller, and the other was to retrofit my Brooxes BBKK KAP rig with a 2.4GHz radio.

The Radio

As often happens on the KAP forums, someone who's just getting started asked some good questions about how to get going, and what to buy. The discussion turned towards radios. I tossed in my two cents, but luckily some other folks did, too. One of them posted a link to a four-channel 2.4GHz radio being sold out of China. Shortly after that, someone posted a link to a six-channel 2.4GHz radio with some ability to program it.

The shipping on the four-channel radio was a little prohibitive, but that's to be expected, living on an island out in the Pacific. The shipping on the six-channel radio was significantly lower, and basically made the extra two channels and programmability a free upgrade. I went for the six-channel radio.

Turborix 6-ch Radio - Package Contents

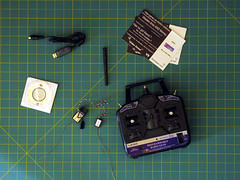
The contents of the package made me smile. There was a very solid 2.4GHz transmitter, a microscopic little receiver, a mini-CD with the drivers and configuration software, a cable, and... no manual. Though there were two $5 coupons with some of the funniest advertising I've ever seen for RC hobbies. It made for some great reading.

My eventual plan with this radio is to gut the transmitter and move the contents to a new enclosure I can clip to my belt or to my backpack strap. Joysticks really aren't the ideal input for doing KAP, with knobs, sliders, and buttons being better choices. Luckily most RC gear uses standard potentiometers on their joysticks, so swapping out a dual-axis stick for two discrete knobs is simply a matter of finding two potentiometers that match the electrical characteristics of the ones in the joystick.

But for now I'm happy to use it as it was made.

The driver and software installed without a hitch, though some of the windows that popped up were in Chinese, and the ones that had been translated to English had some quirks in the translation. On the whole, though, it was fairly straightforward to decipher.

Configuring the axes took a little head-scratching and forum searching. This wasn't made any easier by the fact that every time I powered up the transmitter, my laptop lost its wireless network connection. But eventually everything was sorted out.

The two joysticks map to channels 1-4 on the receiver in one of four "modes" that place the various channels on different joystick axes. I stuck with "mode 1", the default. With KAP gear I don't really care which channel I plug a servo into, so it's a non-issue.

The radio also comes with two switches and two potentiometers with knobs. I wanted to use one to drive the KAP rig's tilt. With the addition of a sticker on the transmitter indicating degrees of down-tilt for each position of the knob, I'd know exactly where the rig was pointed. And this is where the head-scratching really began.

The knobs and switches don't map to any channels. They're generic analog and digital inputs. You can mix them with other channels, use them to select whether a channel is single or dual rate, or to do various other functions. In the end I selected one of the knobs, used it as the input to a mixer function that was set to be on all the time, and tied the output to channel 5. Voila, now that knob goes to channel 5.

The switches were set up to enable or disable a mixing function that tied the other knob to channel 6. With the knob maxed out, flipping either switch sends that channel to its end of travel. Voila, switch-enabled shutter.

Endpoint adjustment has got to be my favorite feature of this radio. Careeful tweaking of endpoints let me set a very precise range for tilt, with one end of the knob's travel taking it exactly horizontal, and the other end taking it exactly vertical. Adjusting the throw of the shutter servo was done in a similar fashion. And when I do eventually convert my rig to the GentLED-CHDK2 for shutter triggering, the same setup will work just fine.

In addition to moving away from an AM radio, this conversion shaved well over a pound off my backpack's weight at a cost that's a fraction of most 2.4GHz radio systems. I'm pleased as can be with it. I just can't wait until the weather clears and I'm able to test this system in the field.

Next time, I'll talk about the AutoKAP controller. That is a completely different story.

-- Tom

Monday, January 5, 2009

Testing the New Winder

I had some good opportunities to test my new winder in the field. I'm declaring it a qualified success, but those qualifications are important, and may necessitate making a new one.

On the good side, it's super smooth to operate. The bearings in the center handle let the line pay out like silk. On the bad side, it's so smooth to operate that line will pay out fast enough to drop the kite out of the air. So that's a mixed blessing. But it's one I can live with and learn to take advantage of.

On the good side, it feels solid as a rock. I really like having a winder that doesn't flex, walk, creep, and move around as you wind line on and off. This one's a serious chunk of winder. On the bad side, it's as heavy as a rock, too. In my mind this is unacceptable since many of the places I fly can only be reached through serious hiking. Erick, who showed me this design in the first place, said my 1/2" ply is way too heavy. He rarely uses material thicker than 9mm. Mine's 12.5 to 13mm. So there's room to improve.

On the good side the larger diameter of the spool means it really takes line in in a hurry when you crank. My original winder was 6" in diameter, and wide enough that that diameter didn't change much as line was wound on. This one starts at 7.5, and the last hundred feet are winding on at about 10.5". That translates to a difference of almost a foot per turn of the winder at the very end of the line. On the bad side this makes for less leverage, but this is offset by the smoother action of the winder.

And I finally ran the compressive hoop force analysis. Without getting into the nitty gritty of the numbers, and being utterly pessimistic, I'm getting a maximum of 220 pounds of inward force per bolt. The shear strength on those bolts is much higher than this, so the real concern is having a bolt rip out of the side plate. But baltic birch plywood is pretty tough stuff. I'm not worried. Still, on a re-design, this is a good number to have in hand.

But that's what I'm looking at: a re-design. I'm planning a hiking trip in July where I expect to hike from 11,000' to almost 14,000' above sea level. Right now my pack is 22 pounds. I need to shave that by a lot. One area I can improve on is my winder. Given that Erick already pointed out some areas of improvement, I plan to work on it and come up with a new design between now and then.

Tom

Tuesday, December 30, 2008

Rainy Day - No Kites to Fly

I've been on vacation for the past week, but the weather has been rainy and I've had a cold most of the time. So I've been out a total of two times with my kite gear, and I have very little to show for it. I could be depressed, or...

I could start a shop project!

Ok, to be fair I finished a shop project. This one has been hanging around for almost a year now: the new kite line winder. I started CAD drawings last year, beginning with a design that's sold commercially under the name "Windbreaker". One of the people on the KAP forum described it as "Knucklebreaker" because of the handles, bits, and pieces that hang out when it's rotating, so I moved away from it. Erick, one of the KAPers from Germany, posted pictures of his winder, and I liked it. So that's the direction my CAD drawings went.

A few weeks ago I picked up the 1/2" baltic birch plywood I needed for the project, and I finally got around to cutting out parts. Over the last week I've sanded, tung-oiled, and finished building the thing.

New Winder

(Yes, that photograph was taken outside my house... in the rain... It really hasn't let up much.)

It's heavier than my old winder, but a lot more solid and way easier to hold. I haven't had the chance to field test it yet, but if the weather clears any time in the next few days that's my top priority.

Winder - Grip Side

The center grip is a wheel off of a scooter that was run over by a car. The bearings are still good, so I stuck with the originals. If they start to go, I've got a tube of ABEC7 bearings I picked up to replace the ones in my Foredom handpieces. That was years ago. Dang Foredom makes a good product.

Winder - Handle Side

The winder handle is a piece of 1" diameter Delrin, bored out to ride on a stainless sleeve that's pinned in place by a 1/4" bolt. The design for this part started out using bearings as well, but there's really no point since Delrin is a bearing material, and it rides great on the stainless. So the design was simplified. I tried to make it comfortable to hold, but if it needs adjustment it's a simple lathe job.

Winder - Carabiner Detail

The row of holes out toward the edge of the winder is so the line can be clipped off with a carabiner to fix it to a particular length. This lets me put out, say, 200' of line, clip off, anchor, and attach my rig.

So far I'm pleased with the winder, but it does mean changing some of my procedures in the field. My previous winder had a hole clear through it, so it was pretty easy to clip off the line, shove the winder up onto my arm, and use both hands to hang the rig or use the transmitter. This winder won't allow for that, so I'll have to work out new procedures.

I do like the larger moment arm on the winding handle, and the free-spinning bearings on the grip. I think it'll be a lot easier to bring line in. That might offset any inconvenience the lack of a through-hole will present. Time will tell.

I'll write more once I have a chance to field test it.

Tom

Sunday, December 21, 2008

Toys from the Shop

Having a home shop isn't all about making tools or making parts. Some of the most rewarding projects I've done have been toys, or repairs for toys. With the holidays drawing on, it's fun to make toys in the shop to share as presents, or simply to share as soon as they come off the lathe or mill.

Spinning Top

A little while ago I got back into making tops. Nothing advanced, just something fun to make on the lathe and share. It's the kind of thing anyone with a few shop tools could do. I did this one on a Taig lathe, which is a small benchtop lathe originally designed for making contact lens molds. I've never used mine for work as fine as that, but for things like this little top it's ideal. The same kind of thing could be done on a drill press with some files and a little more time, though.

The big trick with tops is that everything has to be coaxial. If you have any part of the top off the centerline, the top will wobble. Wobbles rob the top of kinetic energy and make it spin for a shorter time. The more concentric and coaxial you can make it, the better.

For this one I chopped off some 1/8" diameter brass rod, chucked it in a collet chuck, and cleaned up both ends. I then drilled some 1" diameter Delrin undersize and pressed the rod in place. The assembly then went back in the collet chuck. I also chucked up a bearing with a 1/8" ID hole in the tailstock, and brought that in as a live center to support the outboard end. The body of the top was then cut using an 0.060" parting tool. Not the best way to go about it, but it got the job done. I wasn't all that careful about the actual depth of cut, but I made each pass in 0.050" steps.

This top will easily spin for over a minute. It's not that hard to do, and the kids have a blast with them. Larger tops will have longer spin times, and certainly better thought out ones will spin longer.

For the ultimate in spinning top design, look no further than the mathematics for calculating steam engine flywheels. Ever wonder why the flywheels on steam engines are spoked? If you look at the math for the kinetic energy of a rotating annulus, you find that for a given outside diameter, there's a break even point on the inside diameter where you stop benefiting from additional material. Inside that ideal ID, steam engine designers would spoke out the wheel to cut weight and save iron.

The fine-tuning of spinning top design reached something of a pinnacle in the Quark, a top designed by Jim Lewis, who incidentally also started up the eMachine Shop company. What sets the Quark apart, aside from being a very efficient flywheel design, and having a shaft that is designed to get the most speed as possible out of the human fingers, is that it can be dynamically balanced to remove almost all residual wobble. The tops come with a laser pointer and a set of counter weights that can be installed in pockets underneath the outer rim of the top. By reflecting the laser light off the top surface, it's possible to visualize the wobble in the top and balance accordingly. Spinning times of fifteen minutes or more are common.

But they also take considerably longer to make, and are made to much tighter tolerances than my little Delrin and brass top. For the purpose of cranking something out in the shop you can hand off to a kid and watch them have fun, sometimes the simpler approach is more effective.

Tom

Thursday, November 6, 2008

Back to the Shop

For a while there photography took over my blog. No problem there, I enjoy photography and I will continue doing so. But it took over my blog at the expense of the shop, and that will never do.

There are some projects on the horizon that will require the Tiny Machine Shop be active again. On the short list are some woodworking projects, at least one electronics project, and two machining projects. It's good to get back out in the shop!

Rather than water down the posts between machining and photography, I've moved the photography posts over to a new blog strictly for them:

The View Up Here

Since it is a new blog, I'm going to start over at the beginning and describe kite aerial photography in a way that should help someone who's interested to get going with it. I hope you'll give it a look.

In the meanwhile I plan to get my shop cleaned out, get the new projects lined up, and start posting about them as well. Stay tuned!

Tom

Sunday, November 2, 2008

At Long Last - Waipi`o Valley


Waipio Valley


After a year of trying, on and off, I finally flew a camera in Waipi`o Valley.

The history of Waipi`o, like the history of Hawai`i itself, is long, varied, and way too easy to simplify at the expense of the really interesting bits. (If that doesn't get you Googling "waipio valley" then I didn't do my job right.)

Since human occupation of the Big Island, it has been used for agriculture with few interruptions. In pre-European-Contact days, at various times it supplied the Islands with food during times of drought. In post-Contact days, it continued in the role of being one of the major agricultural concentrations in the Islands. In the early 1940's it was heavily populated and cultivated. But the tsunami of 1946 wiped out almost everything in the valley, and few of the residents who had spent their lives there felt inclined to return.

Nonetheless people did come back, and to this day it is still being farmed by people who choose to risk the tsunamis, the floods, and the other conditions that can happen there. It's not hard to see why.


Waipio Leeward with Kiteline


The biggest problem with doing KAP in Waipi`o is that the prevailing winds come up the coast and around the cliffs to the south. This windward view pretty much tells it all. Cliffs almost a thousand feet high make for interesting wind inside the valley. I found three distinct strata, all within 500' of the valley floor. "Turbulence" is putting it mildly. Nonetheless, the wind was steady enough for me to take several panoramic sequences.


Waipio-4-Flickr


So what was the trick? Using the right kite, of course. On previous attempts I'd flown a Flowform 16, which needs a fair bit of wind in order to fly a camera. I started with the Flowform, but switched to my 6' Rokkaku that my friend made for me. It can fly the camera with less wind, at a higher line angle, and because it's framed in fiberglass it can deal with the gusts better than a carbon fiber framed kite would be able to.

Even so, toward the end it was catching more wind than it could handle. After landing the camera I had a bit of a fight on my hands to get the kite down safely. Luckily the Rokkaku takes its origins from a Japanese figher kite, and as such its moves are actually pretty predictable and very well documented. In a power-dive you let out line quickly, and the kite rights itself and heads for the sky. I had two power-dives, both of which turned around quickly with careful line handling. In the end all my gear made it down in one piece.

It's been a long time since I've done any KAP worth posting. I couldn't be happier with how the day turned out.

Tom

Saturday, November 1, 2008

Pumpkin Carving

Since I was home sick most of last week, pumpkins didn't get carved in a timely fashion. To put this another way, we were gutting them less than an hour from when the kids suited up to go tricking and treating.

Time was not my friend...

In the past I developed a pretty reasonable set of tools for working on pumpkins. My favorite is a jigsaw blade I stuck on a plywood handle. I've found no better tool for opening holes in pumpkins. It makes the commercially available tools look pitiful. At some point I need to mount it in a proper handle and make it permanent. For now, it's working great.

The big addition this year was the Foredom flex shaft tool. I'd heard in the past that Dremel tools really didn't work on pumpkins. But I'm beginning to suspect that is incorrect, and that it was the burr that was at fault. I did try a stock Dremel burr in my Foredom, but it had a rotten time cutting.

The two burrs that really worked well were carbide burrs used for machining PC boards and the Tornado structured tungsten carbide bits that Woodcraft sells for doing woodworking with Foredom tools. At 14k RPM, these essentially liquefy the pumpkin. There's very little side-force on the handpiece as you pull it through the pumpkin, and the Tornado bits like to cut at a single depth, so you're not constantly fighting dig-ins.

In the end I was able to do two pumpkins, beginning to end, in less than an hour. One was a ghost design with two cut depths. The other, a cat designed by my daughter, was completely silhouetted. Both worked out great.

I learned something else during all this: The tradewinds were howling last night, and in previous years that would've blown out our candles. This year neither pumpkin had through-holes, except for the chimney hole at the top and two vent holes at the bottom so we could get an updraft through the pumpkin. Using pumpkins without through-holes meant the candles never had direct wind blowing on them, and consequently neither one blew out.

The kids were pleased as punch, and now I have a new tool to bring to bear on pumpkin carving next year. But first, I'd like to get some more Tornado bits!

Tom