For a while there photography took over my blog. No problem there, I enjoy photography and I will continue doing so. But it took over my blog at the expense of the shop, and that will never do.
There are some projects on the horizon that will require the Tiny Machine Shop be active again. On the short list are some woodworking projects, at least one electronics project, and two machining projects. It's good to get back out in the shop!
Rather than water down the posts between machining and photography, I've moved the photography posts over to a new blog strictly for them:
The View Up Here
Since it is a new blog, I'm going to start over at the beginning and describe kite aerial photography in a way that should help someone who's interested to get going with it. I hope you'll give it a look.
In the meanwhile I plan to get my shop cleaned out, get the new projects lined up, and start posting about them as well. Stay tuned!
Tom
Thursday, November 6, 2008
Sunday, November 2, 2008
At Long Last - Waipi`o Valley

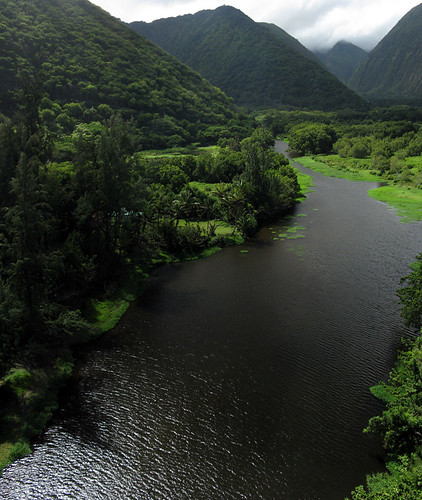
After a year of trying, on and off, I finally flew a camera in Waipi`o Valley.
The history of Waipi`o, like the history of Hawai`i itself, is long, varied, and way too easy to simplify at the expense of the really interesting bits. (If that doesn't get you Googling "waipio valley" then I didn't do my job right.)
Since human occupation of the Big Island, it has been used for agriculture with few interruptions. In pre-European-Contact days, at various times it supplied the Islands with food during times of drought. In post-Contact days, it continued in the role of being one of the major agricultural concentrations in the Islands. In the early 1940's it was heavily populated and cultivated. But the tsunami of 1946 wiped out almost everything in the valley, and few of the residents who had spent their lives there felt inclined to return.
Nonetheless people did come back, and to this day it is still being farmed by people who choose to risk the tsunamis, the floods, and the other conditions that can happen there. It's not hard to see why.

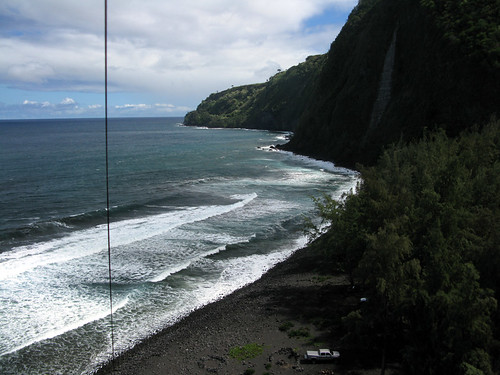
The biggest problem with doing KAP in Waipi`o is that the prevailing winds come up the coast and around the cliffs to the south. This windward view pretty much tells it all. Cliffs almost a thousand feet high make for interesting wind inside the valley. I found three distinct strata, all within 500' of the valley floor. "Turbulence" is putting it mildly. Nonetheless, the wind was steady enough for me to take several panoramic sequences.

So what was the trick? Using the right kite, of course. On previous attempts I'd flown a Flowform 16, which needs a fair bit of wind in order to fly a camera. I started with the Flowform, but switched to my 6' Rokkaku that my friend made for me. It can fly the camera with less wind, at a higher line angle, and because it's framed in fiberglass it can deal with the gusts better than a carbon fiber framed kite would be able to.
Even so, toward the end it was catching more wind than it could handle. After landing the camera I had a bit of a fight on my hands to get the kite down safely. Luckily the Rokkaku takes its origins from a Japanese figher kite, and as such its moves are actually pretty predictable and very well documented. In a power-dive you let out line quickly, and the kite rights itself and heads for the sky. I had two power-dives, both of which turned around quickly with careful line handling. In the end all my gear made it down in one piece.
It's been a long time since I've done any KAP worth posting. I couldn't be happier with how the day turned out.
Tom
Saturday, November 1, 2008
Pumpkin Carving
Since I was home sick most of last week, pumpkins didn't get carved in a timely fashion. To put this another way, we were gutting them less than an hour from when the kids suited up to go tricking and treating.
Time was not my friend...
In the past I developed a pretty reasonable set of tools for working on pumpkins. My favorite is a jigsaw blade I stuck on a plywood handle. I've found no better tool for opening holes in pumpkins. It makes the commercially available tools look pitiful. At some point I need to mount it in a proper handle and make it permanent. For now, it's working great.
The big addition this year was the Foredom flex shaft tool. I'd heard in the past that Dremel tools really didn't work on pumpkins. But I'm beginning to suspect that is incorrect, and that it was the burr that was at fault. I did try a stock Dremel burr in my Foredom, but it had a rotten time cutting.
The two burrs that really worked well were carbide burrs used for machining PC boards and the Tornado structured tungsten carbide bits that Woodcraft sells for doing woodworking with Foredom tools. At 14k RPM, these essentially liquefy the pumpkin. There's very little side-force on the handpiece as you pull it through the pumpkin, and the Tornado bits like to cut at a single depth, so you're not constantly fighting dig-ins.
In the end I was able to do two pumpkins, beginning to end, in less than an hour. One was a ghost design with two cut depths. The other, a cat designed by my daughter, was completely silhouetted. Both worked out great.
I learned something else during all this: The tradewinds were howling last night, and in previous years that would've blown out our candles. This year neither pumpkin had through-holes, except for the chimney hole at the top and two vent holes at the bottom so we could get an updraft through the pumpkin. Using pumpkins without through-holes meant the candles never had direct wind blowing on them, and consequently neither one blew out.
The kids were pleased as punch, and now I have a new tool to bring to bear on pumpkin carving next year. But first, I'd like to get some more Tornado bits!
Tom
Subscribe to:
Comments (Atom)