But the feeling will pass...
I set up to modify my pan servo, this time carefully reading the docs that came with my BBKK. I chose to use a new servo, one that's 20g lighter than my current pan servo. I read the docs carefully! Use the 1" #4-40 flathead screw... flathead screw... there's no flathead screw in here! So I pulled one out of my stock drawers. Now use a #6 drill to open up the hole in the... #6? That won't clear a flathead #4 screw! I'll use a drill big enough. Don't go deeper than 0.250", ok... Drill drill THUNK...
Yeah, I drilled straight through the gear and knocked the splined shaft right off. One servo down. Looking back through the bag of parts I found a #4-40 pan head screw, which would easily go down a hole drilled with a #6 drill. >sigh< Sometimes it doesn't help to know all the technical names for various screw heads. (For what it's worth, a pan head screw is flattish, but it's flattish both on top and on bottom, whereas a flat head screw is flat on top and tapered at an 82 degree angle on bottom.)
With the proper screw and drill in hand, I moved the job over to the lathe where I have an indicator on the drilling tailstock. I shallowed up and went for an 0.140" depth. This sunk the screw and still left plenty of meat on the splined shaft. With everything back in place I re-balanced the servo, re-assembled my rig, and now have a properly trimmed out pan axis.
But I'm down a servo...
No matter, the nearest hobby shop has gear sets for the busted servo (an S3003), so I can get it back up and running for less than ten dollars.
In the meanwhile, 3000m of kite string showed up at the post office, so I need to get busy making winders. Should make for a fun weekend!
Tom
Tuesday, November 20, 2007
Friday, November 16, 2007
Sometimes You Feel Like a Dork
And sometimes you wish you didn't. Ok, most of the time I wish I didn't. But I'm glad I got it out of the way before I really felt like a dork. Here's how it is:
I finally started posting pictures of my KAP rig to Flickr. Good thing, too. Brooks Leffler made a number of comments on various aspects of my rig. One concerned battery weight. I have a quad AA holder with four AA batteries in it. 110g. Brooks suggested replacing it with a quad 2/3 AAA NiMH pack. That drops the battery weight down by more than half. For a 700g rig, that's a lot.
Another area I'm trying to trim weight is the servos. I started with three Futaba S28 servos at 55g apiece. I replaced the shutter and tilt servos with Futaba S3003 servos, dropping those two to 34g. The plan now is to install a TowerPro SG50 as the shutter servo (5.5g), take the S3003 I have on the shutter now and move it to pan (55g drops to 34g) and dump my total shutter mass from 123g down to 73.5g. Between this and the battery mod, I can shave well over 110g off my rig's weight. A little more judicious trimming and I can get a 700g rig down to half a kilo. It may not sound like much, but given the kites I have it opens up a lot more wind range.
But the real kicker came later: I posted pictures of my Picavet, which is the thing the whole rig hangs from. I've never really felt comfortable with it because it hangs from a single gear on a servo. All 700g of it. There's plenty of thread engagement, but it's still just steel threaded into nylon that's holding things in place.
Brooks commented on the picture and pointed out that I'd utterly missed a major part of the construction manual for the BBKK: the part where the servo gear is modified so it has a #4-40 threaded screw installed with the head on the inside of the servo, so all the weight is being borne by a metal-on-nylon shoulder rather than metal-on-nylon threads. As he put it, it's about 1000% more secure than what I'm running now.
Which makes me feel a whole heckuva lot better about how my rig will be after I modify it tonight! Months of flying, and the thing has never let go. So with this mod I figure I can fly forever and it'll never let go. Yeeha!
But...
Dang, don't I feel like a dork! Brooks asked if I'd read the manual. Well yeah, I did. Mostly. Sort of. Except the part about that screw installation because it was confusing...
Cripes, but how many tech support analysts can tell stories like that one? "You wouldn't believe this guy! He didn't wear a grounding strap because he said it was 'confusing', and now he's blown $100k in electronics to ESD hell! What a jerk!"
Yep. That's me. I read the manual, and skipped the confusing parts...
Which is why, I guess, a friend gave me a poster many years ago. "Mistakes - It could be that the purpose of your life is only to serve as a warning to others."
Let ye be warned! Don't be like me!
The postscript to all this, though, is that my rig never fell, and now that I'm embarrassed but wiser, it never will.
Tom
Friday, November 9, 2007
Well and Cutting
I'm more or less healthy and hale, and should have a chance to make that mounting plate for my friend this weekend. Pictures as the thing comes off the mill.
On another note, I may have found a neat opportunity to fly my kites for science. (Did that really sound as bad as it felt when I typed it?) The idea is to fly an instrument package on my kite that will take differential temperature measurements across 10cm, 30cm, 100cm, and 1300cm distances using high speed, high-sensitivity microthermal probes, all the while recording meteorological data (temp, humidity, barometric pressure, etc.) as well as GPS location, and log it all to an SD card as quickly as I can make the hardware do its job. The end result will be a dataset that can be used to determine the contribution of the air at each altitude toward atmospheric seeing at the site. ("Seeing" is a term indicating how much stars twinkle, or get shifted around by the air between them and your telescope. Good sites have low seeing, rotten sites have high seeing.)
The advantage to knowing the answer to this is that you take care of seeing at different altitudes using different techniques. If most of the seeing is coming from 6km up, ground level adaptive optics won't do a whole lot to fix the problem. If most of the seeing is coming from the 0-500m regime, it will. (And if most of the seeing is coming from heat plumes inside the telescope dome itself, it's a whole 'nuther set of problems to be solved!)
Luckily this has been done, primarily with weather balloons. But balloons cost (upwards of $1000 for a balloon and a non-recoverable instrument package), and you don't get to fly them everywhere. If you need to sample kilometers of air column, you don't have much choice but to fly a balloon. But if you only need to sample 500m and below, a kite with a 100% recoverable instrument package starts to look attractive.
There's a lot that needs to happen between now and then. I've started my literature search, and I have a vague hand-waving idea of the differential temperature sensor design. But I have a long way to go between that and a deployable instrument package.
In any case, this is a fun one. And it might mean I get to fly my kites at work!
Tom
Monday, November 5, 2007
That'll Stop Ya
I've been dodging a cold for weeks, but it looks like it finally caught up with me. So no electronics mounting plate for me today. I need to do some re-design on the plate to accommodate larger bolts, so the time will likely be put to good use. But it's still discouraging to be so close, and have to wait another day.
I did get some good news, though: The baseplate was put into service tonight, and my friend's quadracopter flew with a nice, steady hover at 38% throttle. So it's got power to spare, and the baseplate helped make the whole structure very rigid and controllable. It worked! So life's not all bad.
Also, my other friend started work on my 6' rokkaku kite today. She's extremely fast (and good!) with a sewing machine, but this is a new material, a new thread, and her first time making a kite. So I really don't know how things will work out. My job is comparatively simple: Cut spars to length, make some Delrin end-caps for them, and make a bridle. I'm really really looking forward to flying it once we're both done. I had an abortive KAP session in Waipi`o Valley a few weeks ago that I'd really love to get back to with the rokkaku. Its higher line angle should make for a completely different experience. Can't wait!
Now I just need to get well...
Tom
Parts Beget Parts

I knew it wouldn't end there.
No, seriously, I knew it wouldn't because the baseplate I made had no provision for mounting the electronics and sensors for the thing. That was on purpose. It's a double-decker design, and the electronics are supposed to go on top. So I'm designing a new plate to hold the MPU (for the moment a Pololu Robotics Orangutan controller) and provide mounting points for the 6DOF IMU and any sensors that are likely to be used during prototyping. I really don't know what those sensors might be, so I'm sticking a bunch of tapped and clear holes on the outer edge to make life easier. One of the pieces of equipment that's to be bolted down is a combination 5V and 3.3V regulator, so the plate is also designed to act like a heat sink.
And I know this isn't the end of it, either. The Orangutan is temporary, and will likely be replaced as more systems are added. But that's ok. The baseplate was about a two hour job running at about 50% the speed I intended, and this one should be considerably shorter.
In addition to the plate I'll need to make three Delrin standoffs between the Orangutan and the plate, as well as either four more of the black spar blocks or a central pillar. (I'm aiming for the central pillar... weighs less.)
In any case, I'm thoroughly enjoying myself. It's great to be designing and making stuff in the shop again. Aaaaaaahhhh...
Tom
Sunday, November 4, 2007
Making Chips (Finally!)
I finally made chips with the new setup. There were issues...
First and foremost, you can't leave a mill for over a year without adjusting its gibs. After two Z axis stalls, I found out the Z axis gibs were so tight it was like pulling teeth to get it to move. I think I damaged the Z axis nut. I'm not happy with myself. In the middle of cutting a part, I pulled the spindle off, removed the Z axis leadscrew assembly, and did general adjustments. It's now running smoothly.
I also remembered something from my last wanna-list: I need a cooling fan for my spindle motor! That's one I never got around to doing, and have now moved to the top of the list. A better cooling arrangement for the motor driver electronics would be nice, too, but not as critical.
In any case, I finally loaded an honest-to-goodness part program on the mill, touched off the material, and clicked the go button. It went. And except for the scare with the Z axis, it ran perfectly. After much hemming and hawing, I'm making parts again!
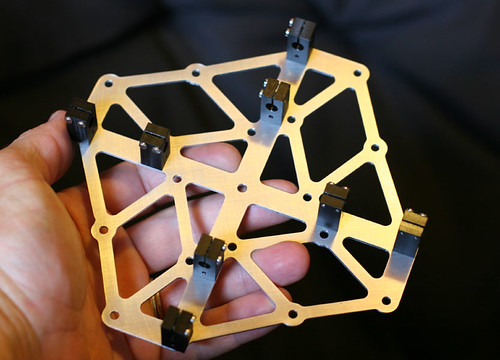
So what parts? A friend of mine is making a quadracopter. (It's worth a Google search if the term is unfamiliar). He's been prototyping it up to this point, but when one of his motor pods ripped off and went flying across the hall during a test run on some new props, it became apparent that some stuff, at least, had to go into production mode. So the motor pods have a nice new baseplate with over fifty millimeters of grab per spar, tie-down points for the batteries (big honkin' LiPoly batteries that need to be mounted firmly to something!), all sorts of good stuff.
The baseplate was a fun design, and a first for me for how I went from prototype to done:
I put the prototype design down on a desk, placed a 6" scale on top, and took a picture with a digital camera. I loaded the picture into Photoshop and cropped it to a nice and resolution to leave the 6" scale indicating proper inches (that is to say I got it scaled 1:1). Next the picture was loaded into Rhino3D as a background image, and scaled so it stayed 1:1. Finally, I drew outlines around the batteries, spars, etc. and turned them into a 3D model. Once things were cleaned up and re-arranged to make better use of the space available, I did a polar array around the center of the quadracopter and called that my pattern.
After drawing struts to connect all the bolt holes and mounting points, I made the heavy members 10mm wide and the lighter ones 4mm wide. A lot of filleting followed, and the design was done. In the end there were no lines parallel to any coordinate axis, and no two struts wound up being lined up in a single line. It's one funky looking part. But it works! And it all started with a digital photo of a prototype with something in the frame for scale.
It was really gratifying when I printed out a 1:1 of the design and had my friend take it home to compare against his existing parts. We both could've sworn I'd drawn the batteries too small. Turns out I hadn't. Everything was the right size, and he gave me the green light to cut parts. Now that the parts are cut and things are getting bolted together, I'm even more pleased.
Tom
Subscribe to:
Posts (Atom)