I had laser safety training on the other side of the island. Up by 4:30, out the door by 5:30, way too much driving, and not enough time to eat lunch and fly my kites. So I skipped lunch and flew my kites anyway, and learned all the ways I can be unsafe with a laser. (For what it's worth a 60W Nd:YAG laser can do a lot of damage to a person... I want to be safe! I'm asking at work to see if I can be trained as a laser safety officer.)
But the kite flying session really hammered something home: The weather here has been downright rotten for the past few weeks. It's not for lack of trying. I just can't get anything in the air. When I do fly, the pictures are terrible. Too much blur from turbulence, bad lighting from the ever-present cloudcover, and an overall dismal feel to everything I've photographed for well over a month.
Today the wind was extremely turbulent, and even my rokkaku was tossed all over the place. Half the pictures were too blurry to use. When I put up my Flowform 16 it almost got eaten by a monkeypod tree. I finally downed the rig and the kite, wound up my line, and packed up shop. It was a wash. I harbored some faint hope of flying when I got home, but the light was even worse and the wind speed was zero.
Part of the problem is that I'm trying to find new subjects. There are a couple of shots I'd like to get at A-bay, but I need a change of pace. I've tried Hilo twice now, with terrible results. Laupahoehoe looked to be just as bad or worse. Pololu Valley also proved to be impossible with this turn of weather. I'm running out of options. If things don't improve by Friday, my Saturday plan is to drive up to Upolu Point and photograph King Kamehameha's birthplace. At least the winds there should be pretty consistent.
I need a lucky break.
Tom
Wednesday, February 27, 2008
Tuesday, February 26, 2008
Box Camera (Take II)
Luck was with me last weekend! I had run out of wood glue! So I never did start work on that box camera. I say luck was with me, because when I went to the hardware store to pick up some more wood glue, I saw they had a whole stack of finger-jointed wood boxes on a table outside. "Craft project boxes". Ok, making a camera is a craft project. So be it.
I came back the next day with 1:1 drawings and compared sizes. The box is really too big for what I'm after, but only in directions that can handle it. In the direction of focus it's actually a few millimeters short: two. Which is perfect. I can always make spacers to put behind the lens board.
So I now have a neat finger-jointed box, several new strips of 1/2"x1/8" basswood, and the whole bag of wood from my first attempt at a box camera. Tonight I'll measure up the box, throw the thing into CAD, and figure out what I'm going to do with it all. It has a nice close-fitting top I'll probably keep as a cover for the film holder. That should keep stray light off the dark slide slot, and will also double as a back cover when the film holder is removed. (Dust is the enemy of large format cameras!)
I won't have a chance to start building the camera until this coming weekend. Tomorrow is laser safety training on the other side of the island, and the next two days after that should catch me up on machining projects at work. With any luck I can do CAD work in the evenings and get the thing built by next Monday.
Which won't be a moment too soon! I got word back about an archaeology project that's happening out here, and it looks like I'll get to do aerial photography for some of it. I'm excited!
The photographs will be used to make a 3D model of the site, but one of the other people involved said it would be good to take some low-angle art shots as well.
If I can get the 4x5 box camera built and tested in time for this, I'd love to fly it at the site. It has gobs more resolution than my digital P&S (115.2 megapixel equivalent at 2400 DPI), and the large negative can get more detail at higher altitudes than anything else I've got. It would be great to be able to offer it.
Tom
Sunday, February 24, 2008
Pinhole Panoramas

Long long ago, actually quite far far away, I made a panoramic pinhole camera. If you ever doubted that a camera is just a light-tight box with a hole at one end and something photosensitive at the other, build a pinhole camera. The lenses, the detectors, the cool features are just add-ons. The basic idea hasn't changed since the first camera obscura was made hundreds of years ago. A pinhole camera is nothing but a handheld camera obscura with film instead of a white screen.
My panoramic pinhole started life as a film can for 50' rolls of TMax. I saved the cans, and one became my pinhole camera. It has a pretty wide field of view, hence the panoramic prefix. But, times change, people move, things get lost, and my pinhole camera long since disappeared into the ether.
So I made a new one! I had one more empty can, so I wiped it down, sprayed the inside with flat black paint, put a #80 drill through it, and called it good. A #80 drill is 0.303mm in diameter, and the film can is 100mm across. This roughly works out to f/300, or about 8.5-8.8 stops down from f/16. (This is an important number!) With ISO 100 film, an f/16 aperture requires a 1/100 sec exposure time. Run through the stops (you double exposure time with each stop) it works out to about a 3.5 second exposure. To be safe that should be doubled to 5-7 seconds to take care of the nonlinear reciprocity effects films have with exposures longer than 1 second.
I threw the camera and my TMax bulk loader into a changing bag, snipped off about 6" of film (I was short, and really wanted about 6.5"), taped it in place, closed everything up, and opened the bag. The loader went back on the shelf and the camera went outside with me. My daughter picked the vantage point and helped me count. We went with four seconds.
Film came back out the same way it went in. Camera and developing tank in the changing bag, film out of the camera and into the tank, seal everything up, open the bag.
My daughter and I developed the film together. It was her first time ever. It was my first time in about seven years. It was also a great way to test how light tight my changing bag and developing tank are, and to see if the new chemistry works before I put any 4x5 sheets into it.
It worked great! Considering TMax has a shelf life of a couple of years at room temp, and that this film expired a long long time ago, the picture came out great! And I'm all set to develop the 4x5 film tonight when the light isn't so bright.
I really do hope that film photography never entirely disappears. I know Agfa has stopped making film, as has Polaroid. Kodak is still producing film, as is Fuji. If they stop we really do lose something neat: the idea that a camera really is just a light-tight box with a hole at one end. But who knows? Maybe this just heralds the return to the earliest age of photography when people mixed their own emulsions, spread them wet onto glass plates, and took ten minute exposures before rushing the plates into the dark to develop.
Mmmm... I hope we stick with film for a while longer.
Tom
Saturday, February 23, 2008
Full Frame

My B&H order came in Friday, so I pulled out my Bender 4x5, swabbed down all my film holders, discovered I still had two loaded with some Kodak Portra VC 160, and one of them was exposed! I loaded up the other film holders with Kodak TMax, got all my gear in order, and... set foot out of my house. I'm actually feeling pretty rotten today, so I didn't stray any farther than my back yard. But we have a beautiful garden spider on the back fence, and it was very patient with me as I did my best to re-learn how to use my camera. I'm out of practice!
I didn't want to leave the film holder half-exposed, so I went back inside and set up a studio shot that would require camera movements. In honor of the friend who sewed my Rokkaku sail, I covered a table with the unused ripstop from that project, and scattered a bunch of other kite making supplies and tools on the cloth. I plunked the tripod and camera down in front of the mess I'd just made and started to arrange.
There's something completely different about using a large format camera. You don't have a viewfinder. You don't have an LCD screen. You have a ground glass that's letting you see the very light that's passing through the lens in front of you. Everything is upside-down and backward, and even the simplest scene takes on qualities of an abstract painting rather than a photograph. Things become shapes, arrangements of shapes become washes of color, and the picture is a palette to be changed, shifted, recombined, and ordered. I find it easier to practice the compositional side of photography with a large format camera than with any other kind.
I also found out I'm incredibly rusty when it comes to camera movements! If you've never run into a large format camera the term "movements" may not make sense. Here's the quick and dirty on camera movements:
If you have a lens and focus it onto a screen that is perpendicular to the optical axis, you are bringing a single plane into focus, some distance from your lens. Shift the lens away from your screen and the plane of perfect focus moves closer to you. Shift your lens toward your screen and that plane of perfect focus moves away from you.
But what if you're photographing something that stretches from your feet all the way to infinity? Say you're standing in a field of wildflowers and want them all to be in tack-sharp focus? What then? If focus is the only movement you have available, you put your focus at some midway point and stop down your aperture until the near and far focus are acceptable. In the world of 35mm and digital photography, this is the only option you have. (Unless you have a TS lens, but I'll get to that later...)
Not so with a large format camera. If the optical axis of your lens is not perpendicular to your focusing screen, a strange thing happens: you can actually tilt your plane of perfect focus. Tilt the lens enough and you can bring that entire field of wildflowers into perfect tack-sharp focus. Things above or below the level of the field will be out of focus, but the field itself will be in focus from your feet out to infinity. This movement is called "tilt".
Most large format cameras allow for both tilt and swing. Swing is similar to tilt except it rotates the lens from side to side. Perfect if you're photographing the side of a building at some oblique angle. Some large format cameras allow tilts and swings on both the front (the lens) and the back (the film plane).
Another useful movement the large format camera offers is shift. Let's say you're photographing a tall building. If you tilt your camera up to get it in the frame, the sides of the building will appear to be converging. But let's say you really want that building to have completely parallel sides with the horizontals completely horizontal and the verticals completely vertical. If you're using a 35mm or digital camera, you don't have much choice. You either point the camera up and live with the convergence, or you don't get to photograph the top of the building.
On a large format camera you can typically shift your lens up, down, or side to side. Provided your lens board and film plane are parallel to the side of the building, your verticals will be vertical and your horizontals will be horizontal, regardless of how you position your lens. Shift it up, and you can photograph the entire face of the building in one frame without causing the verticals to converge. Most large format monorail cameras allow shifts on the front and back, though most field cameras only offer shifts on the front. Either way works.
So for this shot I used a lot of tilt in order to get the entire table into tack-sharp focus. I wound up using a little front rise, too, to get things positioned just the way I wanted. I then spent a sweaty twenty minutes under the dark cloth focusing and re-focusing and re-re-focusing with a 30x loupe while I tweaked the tilt. Yes, it should be a lot easier than that. I'm just rusty.
Unfortunately I haven't developed either picture yet. My darkroom is, like many starving artist amateur photographers, my bathroom. No matter how carefully I try to light-seal the door, it still leaks light during the day. Nighttime is another matter, though. If everything works out I should be able to develop both pictures tonight and scan them in the morning. To be honest I'd be surprised if either one comes out ok. It really has been a long long time. And with a 10-second exposure on the studio shot, there's really no telling. Pinholes in the bellows, light leaks at the lens board or film back, or any number of other gotchas and goof-ups could cost one or both pictures. Time will tell.
In any case, it's good to be back in the swing of things. My next task is to find some good subjects for black and white photography!
Tom
Thursday, February 21, 2008
Encouragement and Discouragement
I had a really good conversation with another KAPer who flies much larger format cameras than I'd ever considered. Some of my doubts about my choice of lens and overall design for the 4x5 box camera were put to rest, and I got a lot of good advice for how to proceed from here. The amount of information was nothing short of astounding, and I'm still trying to digest it all. But I do know this: If the camera-building bug catches me as hard as I think it might, this won't be the last camera I'll design and build, and it surely won't be the largest.
I also had the roughest bout of dystonic tics I've ever experienced. This was right before a pretty tricky bit of machining on a part for a shutter assembly at work, so I was a little rattled by the time it all finished. I was also just about falling-down exhausted. I really don't know how people who have full-time full-body tics handle it. I went ahead and machined the part, and it came out ok.
But it brought up a lot of bad memories about people's reactions to my tics. I can't say I don't mind the tics themselves, but they're part of who I am, so I guess I'm used to them. But I'll never get used to how people react. The last time I was really peaking like this one of my co-workers refused to let me drive, claiming I was crazy. They weren't being funny or sarcastic, or anything of the sort. They were dead serious. At one point they refused to get in the same vehicle as me, even if I wasn't the driver.
The same kind of thing has happened recently, too. I've been doing on-and-off mentoring for a local robotics team, and some fairly minor (for me) tics set in. One of the students said, "Tell me that was voluntary. Because if that was involuntary, you've got problems!" I replied, somewhat flippantly, "I have a whole bunch of things I do involuntarily." I guess it wasn't very reassuring. The subject hasn't come up again.
So the conversation with the fellow KAPer was nice in another way, too: My upper-body dystonics don't involve my right arm, so I used that one to hold the phone. I was ticcing up a storm, and our conversation continued as if nothing was happening. Because as far as the conversation went, nothing was happening. It didn't get in the way of what we were talking about, so why should it be a problem?
On my way home after finishing the machining, it just occurred to me that it could be that way all the time if people were just willing to bend a little. My tics don't make me sad, or depressed, or ashamed. It's how people react to them that causes those feelings.
I've probably mentioned it before, but This Alien Shore by C.S. Friedman is on my short list for favorite books to bring with me if I ever get stranded on an island. She explores this idea in the story, and one of the characters even has all the characteristics of TS (though that term is never mentioned in the book, which is one of the things I like about it!) I'd describe her take on this further, but it really would be a spoiler for a good read. Enjoy the book instead.
Back to the subject of kites and cameras, I picked up my B&H package from the post office on the way back from lunch. 50 sheets of film and enough chemicals to develop them all, and then some. I have materials in-hand to build the camera, and incentive to do so after the phone conversation. I'm planning to do some KAP and 4x5 ground photography this weekend, but in the next few weeks I hope to finalize the camera design and start building it.
Tom
Tuesday, February 19, 2008
B&H Order and 4x5 KAP is on its way!
I placed my order with B&H on Sunday, and I got notice it shipped Monday. So fifty sheets of TMax 100 and all the chemicals necessary to develop it are on their way! I also picked up all the aircraft plywood and basswood I need to build the camera body. I spent the better part of the afternoon Sunday measuring up my 150mm Fujinon and its lens board, and a Fidelity Elite film holder. They're in CAD, and are spaced to the correct spacing to get good focus at about 300'. The 4x5 KAP camera is on its way!
I hope to have the design finalized by the end of the week so I can start construction this weekend. The supplies should be here by Friday, but I figure an outing with the Bender and a tripod with a handful of loaded film holders would probably do me a world of good. I doubt I'll be ready to do 4x5 KAP for at least another month.
On another note, I'm almost done rebuilding my Linux machine, vix. A few months ago I let my DNS paranoia slide, and someone in California wound up taking my name from me. I'd had it for over ten years, so this was a little traumatic. In an act of self-retaliation I registered a new domain, paid up well in advance, and set it up to automatically renew when necessary. No more lost names! The new machine is a wonderful AMD dual-core 64-bit beast with 2GB of RAM, 250GB of SATA disk, and nothing else! No CD, no DVD, no monitor, keyboard, or mouse. It's a server plain 'n simple.
I'm planning on using it for photography as well. I'm working on the data pipeline, and should have it done by the end of the week as well. Here's The Plan:
So all in all it was a good weekend. Can't wait to start doing 4x5 again.
Tom
I hope to have the design finalized by the end of the week so I can start construction this weekend. The supplies should be here by Friday, but I figure an outing with the Bender and a tripod with a handful of loaded film holders would probably do me a world of good. I doubt I'll be ready to do 4x5 KAP for at least another month.
On another note, I'm almost done rebuilding my Linux machine, vix. A few months ago I let my DNS paranoia slide, and someone in California wound up taking my name from me. I'd had it for over ten years, so this was a little traumatic. In an act of self-retaliation I registered a new domain, paid up well in advance, and set it up to automatically renew when necessary. No more lost names! The new machine is a wonderful AMD dual-core 64-bit beast with 2GB of RAM, 250GB of SATA disk, and nothing else! No CD, no DVD, no monitor, keyboard, or mouse. It's a server plain 'n simple.
I'm planning on using it for photography as well. I'm working on the data pipeline, and should have it done by the end of the week as well. Here's The Plan:
- Have a place on disk I can dump image files as they come off the camera. JPG for the 5600, RAW for the 20D, and hopefully CHDK RAW for the A650IS when I can afford it.
- Have a cron job look for new files every few minutes, and when it finds them have it dump them into a working area and produce a composite image of a color version, a B&W version, and a nine-tile 1:1 closeup of the image so I can see if there's any image blur. This is a big problem with KAP.
- Set all of these up in a web-based slide show with a big button at the bottom: Keep. Keepers get their original file shunted off to a new working area so I can pull them into Photoshop or GIMP. At this point all the original images are archived and cleared from working disk.
- Now I get to do the digital darkroom thing, and come up with final images.
- At this point it'll crank out a 1024 max-dimension image for Flickr (and upload it!), a full-sized image for Imagekind (and upload it, I hope!) and dump a copy to the screen saver on my laptop so it goes into rotation.
- Done!
So all in all it was a good weekend. Can't wait to start doing 4x5 again.
Tom
Monday, February 18, 2008
Not So Cruel
Ok, so I'm not so cruel to stuffed animals, after all. The parachute worked perfectly, and after a little tweaking, so did Droppy.

The only real change after the first trial flight was to make a pair of Delrin bushings because the edges of the brass tube tended to dig into the kite string, even after some pretty vigorous deburring.
The body of Droppy is made out of some K&S brass tubing I picked up from a hobby shop years ago in Texas. Most model shops carry the stuff, and even some hardware stores. I picked some convenient sizes. Nothing special.

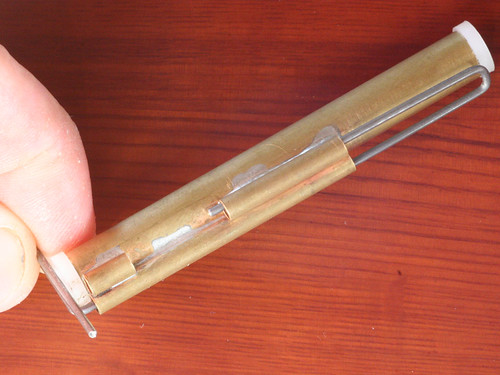
The brass tubes were lined up, bound with iron wire (a twist-tie is iron wire with paper backing), and Sta-Brite flux, solder, and a butane torch were used to fuse everything together. The contrast on this image was bumped to emphasize the soldering job. It's a lot more subtle when you look at it under normal lighting. But the soldering job made for a very sturdy bit of construction. Normal use shouldn't tear it up much at all.
You can also see from this angle that the outside diameter of the Delrin bushing was more or less left unfinished. I was in a hurry, and wanted to finish it before my ride showed up. I'll admit: I rushed it. But the inside has a nice 30-degree taper on the inside edges and a 45 degree taper on the outside. It should be pretty gentle to the kite string.

A string's-eye-view of Droppy more or less shows how it works. The string passes down the main tube, and the whole thing is free to slide up and down the string. The music wire clip is on the up-hill side of the kite line. When Droppy reaches the kite, the clip strikes the bridle ring and slides backward. This is what opens up the lock and lets the poor cute fuzzy stuffed animal drop.

In the closed position the clip spans both the short tubes. Anything with a loop or a small eyebolt can be held in the lock. For the parachute I use on the stuffed animals, I just put a safety pin at the apex of the parachute. The loop at the back of the safety pin goes inside the lock. Slide the clip forward and the parachute is held in place.

When Droppy strikes the kite's bridle ring, the clip slides back (never mind the fingers in the picture) and the lock opens. The parachute is released, the fuzzy critter falls safely to earth, and the kids chase after it, getting tired in the process.
So here's the real genius of this plan: I've already showed them all how to operate Droppy. They already know how to work the line messenger I got from Into the Wind, and they're all good at chasing down parachuting kittens. So we hit the flying field, I put the line messenger and Droppy on the line, hook up to the Flowform (the Rokkaku has far too steep a line angle for this exercise), get it a good hundred or two hundred feet out, and anchor it. At that point the kids can attach the parachute, send it (and its stuffed critter!) aloft, release, chase madly after it, and by the time they come running back the line messenger and Droppy are already back at the ground, ready to be re-loaded.
And while they're running around getting exhausted, I get to read my book! Or take pictures of them from the air using the Rokkaku. I haven't decided which is better...
Tom
P.S. Yes, I finally figured out I could post multiple pictures in the same blog entry. Even I can learn new tricks. What's the world coming to?
The only real change after the first trial flight was to make a pair of Delrin bushings because the edges of the brass tube tended to dig into the kite string, even after some pretty vigorous deburring.
The body of Droppy is made out of some K&S brass tubing I picked up from a hobby shop years ago in Texas. Most model shops carry the stuff, and even some hardware stores. I picked some convenient sizes. Nothing special.
The brass tubes were lined up, bound with iron wire (a twist-tie is iron wire with paper backing), and Sta-Brite flux, solder, and a butane torch were used to fuse everything together. The contrast on this image was bumped to emphasize the soldering job. It's a lot more subtle when you look at it under normal lighting. But the soldering job made for a very sturdy bit of construction. Normal use shouldn't tear it up much at all.
You can also see from this angle that the outside diameter of the Delrin bushing was more or less left unfinished. I was in a hurry, and wanted to finish it before my ride showed up. I'll admit: I rushed it. But the inside has a nice 30-degree taper on the inside edges and a 45 degree taper on the outside. It should be pretty gentle to the kite string.
A string's-eye-view of Droppy more or less shows how it works. The string passes down the main tube, and the whole thing is free to slide up and down the string. The music wire clip is on the up-hill side of the kite line. When Droppy reaches the kite, the clip strikes the bridle ring and slides backward. This is what opens up the lock and lets the poor cute fuzzy stuffed animal drop.
In the closed position the clip spans both the short tubes. Anything with a loop or a small eyebolt can be held in the lock. For the parachute I use on the stuffed animals, I just put a safety pin at the apex of the parachute. The loop at the back of the safety pin goes inside the lock. Slide the clip forward and the parachute is held in place.
When Droppy strikes the kite's bridle ring, the clip slides back (never mind the fingers in the picture) and the lock opens. The parachute is released, the fuzzy critter falls safely to earth, and the kids chase after it, getting tired in the process.
So here's the real genius of this plan: I've already showed them all how to operate Droppy. They already know how to work the line messenger I got from Into the Wind, and they're all good at chasing down parachuting kittens. So we hit the flying field, I put the line messenger and Droppy on the line, hook up to the Flowform (the Rokkaku has far too steep a line angle for this exercise), get it a good hundred or two hundred feet out, and anchor it. At that point the kids can attach the parachute, send it (and its stuffed critter!) aloft, release, chase madly after it, and by the time they come running back the line messenger and Droppy are already back at the ground, ready to be re-loaded.
And while they're running around getting exhausted, I get to read my book! Or take pictures of them from the air using the Rokkaku. I haven't decided which is better...
Tom
P.S. Yes, I finally figured out I could post multiple pictures in the same blog entry. Even I can learn new tricks. What's the world coming to?
Tuesday, February 12, 2008
Cruelty to Stuffed Animals

I've been wanting to build one of these for a while, but I finally got around to it last Sunday.
It started when I was in high school. We'd just moved to Pennsylvania, and on the drive up we stopped off in Washington, DC. A week at the National Air & Space Museum wouldn't be enough time to see everything there, but the time I did spend there was great. On the way from Air & Space to the National Gallery, my mother stopped off at the museum gift shop and bought me a kite. It was a small parafoil. My first real kite since I'd stopped flying Gala deltas years ago.
By the end of the trip I was hooked. I'd flown it on the Mall, been pooped on by a sea gull, and within a month of moving in I'd flown it outside our house, at the Arboretum, at Valley Forge, and practically anywhere else that had enough space to launch. That really was when my love for kites took off, so to speak.
But it was the kids in my new neighborhood who really sparked my interest in doing things with kites. I was a shy kid back then, and in many ways I still am. I didn't hang out with my peers. I hung out with the younger kids because they still knew how to have fun, and they didn't tend to judge someone by what they wore or how "in" they were. And when they saw my kite waaaay up in the air the first thing they thought was, "How can we get it to drop something so we can catch it?"
I wasn't a machinist back then, but I could still make stuff with my hands. So I got some paperclips, bent them around with pliers, and made a little release catch I could attach to my kite line. It wasn't as elegant as, say, the KapKlips Brooks sells on his web site. But it functioned, and within the day I had a paper airplane hanging a few hundred feet up with a parachute sliding up my kite line ready to make it drop. The release worked! The plane flew! And flew and flew and flew. (We never did recover it.)
We dropped all sorts of things this way, but by far the favorite was tennis balls. Since the release catch was made from paper clips, all you had to do was run the clip through the fuzz on the tennis ball, and it was captured. Hit the release and it dropped. Whoever caught the ball "won" (though we never kept score.)
This naturally led to a desire to do KAP. We wanted to hang a camera from the line back then, but couldn't afford to. When I went to college I tried to find ways to pull it off, but didn't. Of course now I've not only put a camera on my kite, I've got a rig that lets me steer the camera, decide when to trip the shutter, etc.
So why not also return to the earlier idea of dropping things?
Recently my kids got a bunch of tiny stuffed animals maybe three inches long. Three dogs, one cat. I took one look and thought, "Hey, I bet I could drop those from a kite!" The idea isn't new. Several years ago I picked up a parachuting teddy bear from Into the Wind that was meant to be dropped from a kite line. But their release mechanism was terrible! In high winds it would release prematurely, in low winds it was too heavy for the kite to lift, and under any conditions by the time it came down it was almost always bent to the point of not functioning. I used it a handful of times and put it away in my kite paraphernalia box.
The real problem with most of these release mechanisms is that they're not really designed to be reloaded. The one that came with the bear was, but it didn't really work. About the same time I got the parachuting bear, I got a "popper", also from Into the Wind. It's a really neat kite-like thing that slides up a kite line, driven by wind power, hits the kite, collapses (with a "pop", of course!) and slides back down. So if I could design a release mechanism that could ride the line ahead of the popper, I was in business.
I wound up making it out of brass tubing. Not the lightest material in the world, but it lent itself well to the task. One large piece of tubing to ride on the kite line, and three smaller ones to accommodate the slide. A quick silver solder job joined the tubes together into a pretty indestructible assembly. The slide was made from a piece of 1/16" steel music wire. I had a whale of a time bending it into shape with my largest pliers. Even high wind is unlikely to mess it up.
And for the parachute? (Hey, even I'm not cruel enough to drop a stuffed animal without a parachute!) I pulled the parachute off the bear, made a harness out of some really thin elastic shock cord, and fitted out the first of the Sky Dogs.
Aaaaaand...
Here's where the story ends. Unfortunately the weather has been less than friendly, with low clouds and mists, rain, and high winds dominating the skies for the past few days. Here's hoping for a dry weekend with decent wind. I'll post more when the animals finally take to the sky.
Tom
Monday, February 11, 2008
Shipping Diatribe
I recently had two experiences with vendors that really hammered home the shipping discrimination that happens when you're living on an island.
One vendor was a metal supplier. $150 in aluminum. Nothing too heavy, and the packaging they used (all recyclable cardboard!) didn't weigh over a pound. 25 pounds total weight. Do they ship US Postal Service? OH NO! No, they shipped using one of the big international shippers. Total shipping cost? $160. More than the metal. Boy that felt good.
The other, which I didn't wind up ordering from, was a printer. They also insisted on using an international shipper. I pointed out it was a domestic order. Nope. I pointed out the package size (a tube) would even fit in my PO box. Nope. They ran postage and it was ten times as expensive. Ten times! Hmmm... $4.60 through USPS Priority Mail, or $44 for a service that actually takes longer?
So here's a question for everyone who works for a shipping company: On what date was Alaska admitted as a state? On what date was Hawaii admitted as a state? Oh, did you forget that they were states? (June 30, 1958 for Alaska, and August 21, 1959 for Hawaii, in case you were wondering. Yes, they have been states since before most of these international shipping companies existed: DHL 1969, FedEx 1971, with UPS being the big exception at 1907). Yes, Hawaii and Alaska are states in what was supposed to be a country of united states. Doesn't sound very united to me.
And here are some questions for everyone who works at a vendor who insists on handling all their shipping through one of the big shipping companies: Did you know the US Postal Service will pick up at your door? Did you know you can get materials dropped off at your place of business? Did you know it really irritates the #@!$ out of people to be treated like second class citizens in their own country because you insist on charging them asinine rates to get your stuff to them? Before you cry foul, may I remind you: TEN TIMES AS EXPENSIVE!
Of more importance to a vendor: Did you know it's pretty easy these days to do a Google search and find another supplier who will use USPS as a shipper? Yeah, I found someone else to do that printing. I'm working on finding another metal supplier. It really is that easy to lose my business because you're not interested in taking care of your customer.
If a company can't be bothered to look at how much their shipper is charging them compared to another shipper, what other aspects of their business are they being sloppy about? And who are they passing on the cost of their sloppiness to? It's well worth asking these questions.
Come on, folks. Bend a little. You'd be amazed what it'll do for your business.
Tom
Sunday, February 10, 2008
Must Get New Camera NOOOOOW!
I've just about had it up to here with my KAP camera. It's a Nikon Coolpix 5600. Great for size and weight, not too bad on optics and detector, but it's got some habits that drive me nuts.
In the default shooting mode the time between button press and shutter trip is on the order of five seconds with two seconds to save. To be safe I allow ten seconds between exposures to make sure I don't jam the camera. (THIS HAPPENS!)
In the higher speed shooting modes the camera likes to go to sleep after about five minutes. It doesn't power down, oh no, it goes to sleep. It's a halfway mode the camera goes into that you can wake it up from by lightly tapping the power button. Which of course I can't do when it's 300' up my kite line. GRRR! And no, this doesn't seem to be a function I can disable. It's a feature, not a bug.
No matter what mode I use it in it's prone to getting into some infinite loop in which it doesn't respond to anything at all. The only remedy is to remove its batteries and re-install them. That's what happened today, after about an hour and a half of trying to photograph black tipped reef sharks. Instead of the two hundred some-odd pictures I thought I'd taken, I had fourteen frames of blah, then nothing. So I swore silently to myself, re-launched, and got about fifty shots of light reflecting off water. No sharks, and I got a sunburn to boot.
So I'm extremely fed up. It's time for a change. I've been using Canon SLR cameras for almost thirteen years, and now have a Canon 20D that I love. Among other things you can leave it on and it'll go to sleep properly! Tap the shutter button and it wakes back up. (Hey, I have a servo for tapping the shutter button!) But I can't afford to put a 20D on a kite line. Not just yet, anyway.
A friend let me try his Canon A-series point and shoot, and I found the user interface very similar to the 20D. Different grip, of course, but the controls all looked familiar. A little poking around at the current offering of Canon cameras broung up the A650IS. It has a large detector (1/1.4" as opposed to 1/2.7" common on most digital P&S cameras), a decent wide focal length (35mm equivalent, same as the 5600), manual, aperture, and shutter priority modes, and controls really similar to the 20D. The image stabilization is secondary to me at this point because I don't think it's really been demonstrated to help with KAP, but I'm more than willing to give it a try. I also like that it has a bayonet collar for auxiliary attachments. This offers a much more solid attachment point for a lens shade than the one I made for the 5600, and is likely to be the first accessory I buy for the thing.
But at close to $350 I'll have to wait a while. So I won't bad mouth my 5600 too much just yet. It might get spiteful.
On another note I finally washed my Flowform 16 and the two fuzzy tails. They'd been getting increasingly gross from the occasional dip in salt water, landings in dirt and sand, etc. The final blow was a sudden rainstorm in town that doused my kite thoroughly (no KAP rig attached, thank goodness!) followed by a mud puddle landing. I ran them on delicate in our washing machine at home with about a teaspoon of 7th Generation HE detergent. They came out bright, clean, and fresh, with my center bridle line dangling loose. I just hope I got the length right when I re-attached it! It's too wet to find out today.
Tom
Wednesday, February 6, 2008
A New Camera - A Box
After thinking long and hard about hanging my Bender 4x5 from a kite line, I came to the conclusion that it's probably not such a great idea for a couple of reasons: First, the real strength of the Bender is that it is a full-movement monorail. With the camera up in the air, I wouldn't be able to use the movements and they wouldn't be of much advantage anyway. Another is that even at four pounds the Bender is heavier than my current kite rig by a lot. So a lighter 4x5 would be better from the standpoint of not having to get kites with higher pull. Finally, the whole focus issue doesn't exist at altitude: Set the focus to 200' or so and stop down enough to make sure you have usable focus out to infinity. Done.
To make a long story short, I'm going to make a 4x5 camera for KAP. It needs to be light, it needs to be strong, it needs to be able to hang upside-down from a kite, and it needs to be able to hold my Fuji 150mm lens the right distance from the film plane. So I'm going to make a box.
More precisely I'm going to make a trapezoidal box out of 1/16" aircraft plywood with 1/8" reinforcements at the edges and corners. 100% glued construction, black paint inside, tung oil finish outside (same as the Bender). It'll take a 4"x4" Bender lens board and a standard 4x5 film holder (I use a mix of Leica and Fidelity Elite, but the form factor is functionally equivalent.) I'd like the whole thing to come in under 700g including the Picavet suspension.
Why go to the trouble? For starters I really love 4x5 negatives, but I've already made that point. An even more forceful reminder came up in the past few days. Someone asked me to price out some canvas prints of some of my KAP images. 24"x36" is about as big as I can print a full-frame shot from the Nikon Coolpix 5600 I'm using. It's a 6MP camera.
By way of comparison, the Cliff Palace negative, scanned at 1200 DPI, can be printed at 114x88. Since I haven't hit the limit of the film with my scan, chances are that can be improved by a lot with a higher resolution scan (I can scan up to 4800 DPI). And since my Fuji 150mm lens is good for both color and black and white, it opens up a whole bunch of options for prints of both kinds. (Though I shudder to think how much a canvas print would be at those sizes!)
I hope it turns out as nice as my Bender did. I'm not much of a woodworker, but this should give me a chance to use my scroll saw on wood, for a change, and maybe wind up with a new KAP tool in the end.
Tom
Sunday, February 3, 2008
Scanning Negatives

I got a new power supply for my scanner and started the long, drawn-out process of scanning some of my 4x5 negatives so I could upload them to Flickr.
I really would like to get back into 4x5 photography, but without access to a positive darkroom I need to work out a procedure for processing and printing the negatives I take. Otherwise it's just so much hand waving and problems with archival storage.
Even as I was pulling up photographs I'd done in the studio, landscapes, sunsets, etc. I knew the one I was really looking for was this one. It's the negative for the fabled 24x36" print of Cliff Palace at Mesa Verde. I had to smile as I loaded it into the scanner, and smiled even more when I saw how it came out. I scanned it at 1200x1200 dpi, but it could stand to be scanned at a much higher resolution if the file wasn't so big.
I remember a fair bit of dodging and burning when I printed it some ten plus years ago. So I pulled it into Photoshop and started to play around. It all came back. What regions I isolated, how much I over or under-exposed each one, all of it. That has to be the most powerful case of deja vu I've ever experienced in my life.
I was concerned, going into this, that I would find the whole digital end of the process tedious, and that I would lose the need to get back into 4x5 photography. Not so. If anything I'm even more excited, and can't wait to start exposing film again. It's been too long.
Tom
So Ya Wanna Fly?
I was asked for a list of resources for folks interested in doing kite aerial photography. The best place to start is Cris Benton's online KAP forum:
http://steel.ced.berkeley.edu/cris/kap/discuss/
A great many of the people doing KAP are on the forums, and all sorts of questions get asked and answered, ranging from how to get started all the way to things like how to equip one's self for a KAP trip to Tahiti. (I'm not kidding about that last one... KAPiTA 2009 is a KAP conference being planned in Tahiti for October, 2009).
Another good resource is the KAP Flickr group:
http://www.flickr.com/groups/kiteaerialphotography/
A fair number of the people from the forum also post their pictures to Flickr. This is not universal because of licensing confusion with Flickr (confusion on the part of people who lift pictures off of Flickr without asking, not confusion on the part of Flickr.) Nonetheless, I post mine there and many others do as well.
If you want to get going in a hurry, the best bet is to pick up a Brooxes Better Kap Kit (or BBKK for short) from Brooks Leffler's web site:
http://www.brooxes.com
The BBKK is meant to be used with practically any point 'n shoot camera, be it film or digital. For SLRs and larger cameras, Brooks offers heavier duty components. But be warned, a 750g KAP rig requires a fairly hefty kite and some serious kite line. A 2500g SLR rig requires a MUCH heftier kite and even heavier kite line. Start small. Seriously.
Which brings us to the next consideration: Kites. I currently have three, and I'm looking at a fourth. My three are a Flowform 8, a Flowform 16, and a 6' Rokkaku. The one I'm planning to add very soon is a Dan Leigh Trooper. I'd like to add a fifth and a sixth. They'd be an 8' Rokkaku and a 14' Dopero. But all this probably sounds confusing, so I'll try to explain:
My rig weighs just under 600g. It's a BBKK with a Nikon Coolpix 5600, a Futaba AM radio receiver, and three servos for controlling pan, tilt, and shutter. In order to lift my rig I need at least 1200g of upward component on my line tension so I have a safety margin of 2x.
Different kites have different wind ranges they can fly in and different line angles they can fly at. Flowforms typically fly at around 40 to 50 degrees. Rokkakus typically fly around 70 to 85 degrees. These are approximate figures since I've flown my FF16 at almost 75 degrees in an updraft, and my Rokkaku has actually gone past zenith, flying at about a 105 degree angle. My FF16 can fly in up to 20 knot winds, but at those speeds the Rokkaku would fold in half. Likewise, 8 knots will let my Rokkaku fly and lift a rig, but at those speeds the Flowform won't even get off the ground.
The point is that no one kite can suit all flying conditions. Sometimes you need a light wind kite, sometimes you need a heavy wind kite. Sometimes you're after altitude and want a very high line angle. Sometimes you're trying to fly out over a subject and want a lower line angle. There's no ideal kite, just lots of choices. And unless you have an infinitely large kite bag, this also means that at some point you'll have to walk away from the perfect subject because you don't have a kite that will fly it.
But I digress. In order to lift a KAP rig you need a kite that is stable, and can produce enough line tension to lift the rig. You also need a kite line that can handle around 7x to 10x the amount of tension you expect to get during your flight. Which typically means a specialty kite that's not available from *Mart, and some pretty serious kite line.
It's worth it to pick up a kite that's good for KAP. Brooks sells some on his web site, and others are mentioned on the forums. Considering a full RC rig may represent several hundred dollars worth of gear, it's worth spending a little extra to get a kite that won't drop everything onto the rocks the first time you take it out.
Once you have your rig and your kite, it's time to get out and get flying! But don't clip your camera rig on until you've really learned to fly your kite, and have learned the wind at your flying site. Try running your kite up to different altitudes to see how it flies. In the town where I live, I need at least 150' of altitude to clear the turbulent surface air. Others report they're fine with 100' or less. At some flying locations I need over 300' of altitude before the kite really gets stable. Practice. Play. Learn. It saves heartache and broken gear down the road.
And finally, clip on, check everything, take a test exposure, and reel out the line. And share the pictures you take so others can see, too! The view up there really can't be beat.
Tom
Saturday, February 2, 2008
Bend the Wind
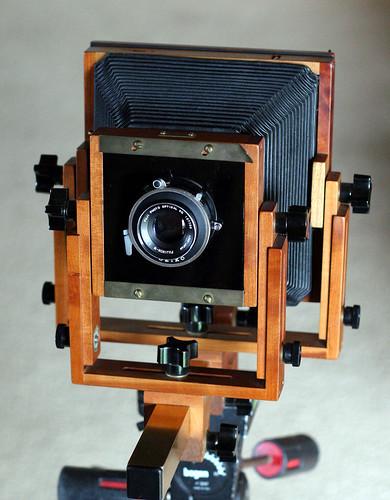
Back in 1996, my wife got me a Bender 4x5 large format camera kit. I'm no woodworker, but the instructions were very good, and kept me from making too many heinous mistakes. The result was a lightweight 4x5 monorail with full movements.
My favorite B&W photograph was taken with this camera, a picture of Cliff Palace at Mesa Verde. I was able to time the tour groups moving through it, and managed to get a negative without a human soul in it. I didn't bring developing gear with me, so I didn't even know if it had turned out until I got back from the trip and could spend some time in the darkroom. I wound up spending an entire weekend doing test prints on the enlarger before printing a 24x36 on Ilford matte paper. The film grain isn't visible in the final print, and it takes a loupe to see the limitations of the optics. It really turned out well. After framing and matting the print, I gave it to my father, who was standing with me when I tripped the shutter. When I visited him in December, I was happy to see it still hanging on his wall.
A few days ago I found out there's a black and white photo contest that's hosted in the town where I live. It's an annual contest of photographs taken in the previous calendar year. A friend of mine entered, and though his entry didn't win it did sell. He was completely stoked, and is already working on his entry shot for this year.
I've never really enjoyed doing B&W digital. It's funny, when I shoot with an SLR I think in terms of color. When I shoot with a 4x5, I think in terms of black and white. There's nothing inherent in either camera that dictates this. I've shot color transparencies with my 4x5, and I used to roll my own TMX film into cans for shooting with an A2 and later an EOS 5. But I'm comfiest shooting B&W on the Bender, or on my wife's Crown Graphic.
Since I've been doing so much kite aerial photography, I figured that would be a neat perspective to use for my B&W shot. And since I really like doing B&W with my Bender, I figured that would be the camera of choice. Sooo...
Yep, I'm going to make a Picavet suspension for my Bender, put safety lines on all the bits and pieces in case something breaks, and make a new lens board so I can put a servo right next to the shutter and mount my radio receiver and batteries on the board as well. (Yes, I really am that crazy.)
I don't have a subject picked out just yet, but that will come. I do have a pretty wide selection of locations that I've already done on a digital camera that might help me pick, but I might go for sometihng I haven't done yet. A big question I have yet to answer is which kite to use. My first choice would be the rokkaku because at the line angles I can get I wouldn't need a whole lot of line tension to lift the Bender. But it's so dependent on local flying conditions, that may not work.
I'll post more once the details get settled. I can't wait to see this camera fly.
Tom
Subscribe to:
Posts (Atom)