I finally made chips with the new setup. There were issues...
First and foremost, you can't leave a mill for over a year without adjusting its gibs. After two Z axis stalls, I found out the Z axis gibs were so tight it was like pulling teeth to get it to move. I think I damaged the Z axis nut. I'm not happy with myself. In the middle of cutting a part, I pulled the spindle off, removed the Z axis leadscrew assembly, and did general adjustments. It's now running smoothly.
I also remembered something from my last wanna-list: I need a cooling fan for my spindle motor! That's one I never got around to doing, and have now moved to the top of the list. A better cooling arrangement for the motor driver electronics would be nice, too, but not as critical.
In any case, I finally loaded an honest-to-goodness part program on the mill, touched off the material, and clicked the go button. It went. And except for the scare with the Z axis, it ran perfectly. After much hemming and hawing, I'm making parts again!
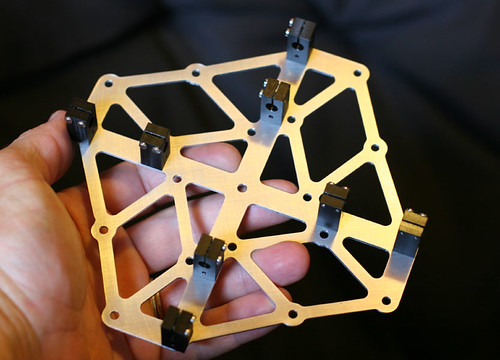
So what parts? A friend of mine is making a quadracopter. (It's worth a Google search if the term is unfamiliar). He's been prototyping it up to this point, but when one of his motor pods ripped off and went flying across the hall during a test run on some new props, it became apparent that some stuff, at least, had to go into production mode. So the motor pods have a nice new baseplate with over fifty millimeters of grab per spar, tie-down points for the batteries (big honkin' LiPoly batteries that need to be mounted firmly to something!), all sorts of good stuff.
The baseplate was a fun design, and a first for me for how I went from prototype to done:
I put the prototype design down on a desk, placed a 6" scale on top, and took a picture with a digital camera. I loaded the picture into Photoshop and cropped it to a nice and resolution to leave the 6" scale indicating proper inches (that is to say I got it scaled 1:1). Next the picture was loaded into Rhino3D as a background image, and scaled so it stayed 1:1. Finally, I drew outlines around the batteries, spars, etc. and turned them into a 3D model. Once things were cleaned up and re-arranged to make better use of the space available, I did a polar array around the center of the quadracopter and called that my pattern.
After drawing struts to connect all the bolt holes and mounting points, I made the heavy members 10mm wide and the lighter ones 4mm wide. A lot of filleting followed, and the design was done. In the end there were no lines parallel to any coordinate axis, and no two struts wound up being lined up in a single line. It's one funky looking part. But it works! And it all started with a digital photo of a prototype with something in the frame for scale.
It was really gratifying when I printed out a 1:1 of the design and had my friend take it home to compare against his existing parts. We both could've sworn I'd drawn the batteries too small. Turns out I hadn't. Everything was the right size, and he gave me the green light to cut parts. Now that the parts are cut and things are getting bolted together, I'm even more pleased.
Tom
No comments:
Post a Comment